2. Workflow with GitHub forks
The recommended workflow for NorESM code contributions is based on using a personal fork repositories of the main NorESM repository in GitHub, which is then cloned to a location were code development and testing can be performed (local computer or HPC server). This procedure follows the guidelines set out in the coderefinery tutorial on distributed version control and forking workflow.
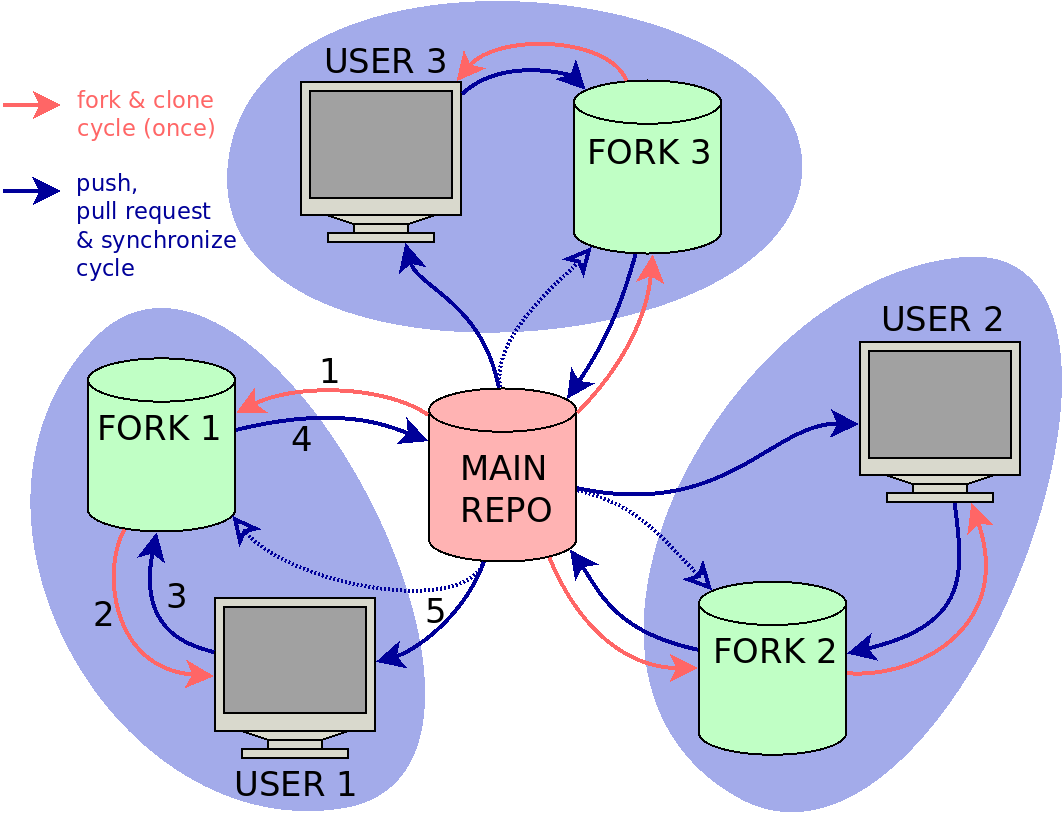
Figure 1: Collaborative fork-based workflow with three users.
Figure 1 shows an example where three users are collaborating with code contributions to a main repository using a fork-based workflow. The workflow passes through the following steps:
Fork the main repository to a new fork repository on GitHub. (first time)
Clone the fork repository to a local computer or HPC server. (typically once per new machine)
After making code changes, push code changes to fork repository.
Create a pull request to push code changes from fork repository to the main repository.
Synchronize local clone (and/or fork repository) with recent changes from the main repository.
2.1. Keep local clone in sync with main repository
When cloning a GitHub repository, the local clone will refer to the original
source as origin and branches in the original source by origin/<branch>,
(e.g. origin/master). For the fork-based workflow, origin will refer to
the personal fork, but it is also useful to be able to sync with the main
repository, often referred to as upstream (we keep to these naming
conventions hereafter). Connections to remote repositories are managed by git
remote
git remote -v # List all remote repositories
The git remote command supports both adding and deleting references to
external git repositories. In additions to upstream it is also possible to
include references to the forks used by collaborators, for short code testing or
longer term collaboration. To add a reference to upstream
git remote add upstream https://github.com/NorESMhub/NorESM.git
To get the latest version of master from upstream
git pull upstream master
2.2. Make code changes
A typical cycle for making code changes have the follow steps:
Make sure your code base is updated with the latest source files
Pull changes from
upstreamif necessaryCheck out a feature branch for your code changes
Make your changes and commit to the feature branch
Push the feature branch to
originrepositoryCreate a pull request to
upstreamrepositoryRemove temporary feature branches after this has been merged with
upstream
In a practical session, this can involve running the following commands
git fetch --all               # Update commit log for all remote git repositories
git pull upstream master      # pull latest from the upstream master branch; do it often if possible
git push origin master        # do this when upstream is ahead of you local (origin) repos, to stay in sync.
git checkout -b my-feature    # create and switch to a new branch "my-feature".
...                           # edit some code
git commit -a -m "Add first draft of my feature"
git push
2.3. Make changes directly in GitHub
For changes that do not need testing (e.g. changes to documentation), it can be more convenient to edit files directly in GitHub. It is still recommend to work on a personal fork, make a feature branch and create a pull request to merge the changes with the main repository, as you would do when working from a local clone repository. See GitHub docs for procedures on how to sync a fork from the web user interface, and how to edit a file in GitHub.
2.4. Pull requests and code merging
You are now ready to make a pull request of my-feature branch. This can by done from github after you pushed. Remember that after the PR is created and reviewed by others, you may need to go back and fix things before it is accepted and can be merged. After merging the PR, you should normally delete the feature branch and update your local repos. to keep things clean. It will still be seen as a (merged) branch in the upstream repository.
- Note: If your feature branch has many commits, it may be smart to “squash”
the history before creating the PR, so that it is easier to review the full changes by others (and yourself). This can be done using the git rebase command, but this will not be covered here.
2.5. Synchronize local repositories through a GitHub fork repository
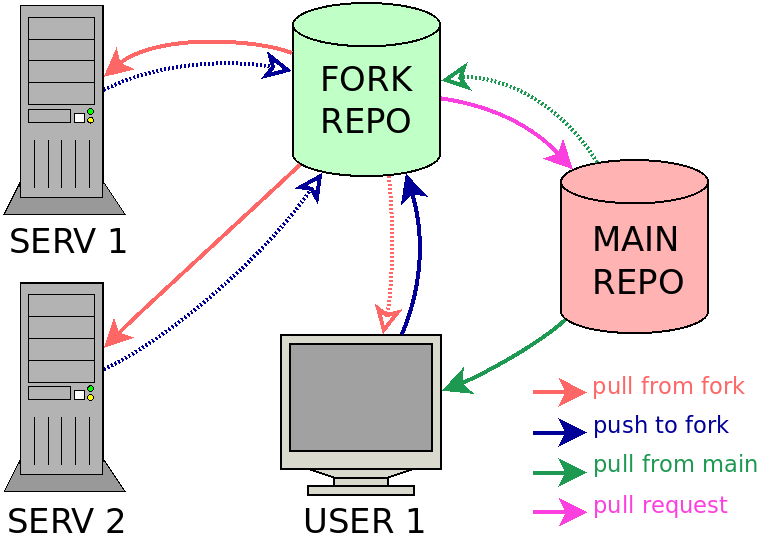
Figure 2: Synchronize code changes between local git repositories through a shared GitHub fork repository.
A GitHub fork repository can serve as a synchronization point for code testing, if this is carried out on multiple platforms (e.g. a local machine in addition to one or more HPC systems). Normally development will take place on only one of the platforms (e.g. a local machine), and all other platforms are used only for testing (solid line arrows in Fig. 2). However, the system also allows code changes to travel the other direction, e.g. if a bug fix is introduced during a test run (stippled arrows in Fig. 2).
2.6. Removing feature branches after merging
After a feature branch has been merged with master in the main repository,
it is useful to clean up local clones and the GitHub fork repository by removing
the feature branch. The fork copy can be removed with an option from the pull
request, after the branch merging has completed, but the clone will still have a
log reference to the remote feature branch. References to outdated remote
branches are removed by using the --prune flag when fetching remote updates
git fetch --all --prune
If the feature branch was merged using the squash and merge or rebase and
merge option, there will not be a merge commit in the log history to indicate
that the feature branch was merged. In this case the feature branch should be
deleted using the -D flag (short for --delete --force)
git branch -D my-feature